2017/07/20

How to Fix iPhone Gets Bricked After iOS 11 Update

iOS 11 introduces significant design changes for the operating system. The lock screen and Notification Center are combined, allowing all notifications to be displayed directly on the lock screen, with options for scrolling up and down to show or hide content. The different pages of the Control Center are unified into a single page, with the ability to 3D Touch icons for more options, and users can customize the settings shown. The App Store receives a complete visual overhaul, bringing a greater focus on editorial content and daily highlights. A "Files" file manager app is available for organization of local files and files stored in cloud services. iPhone and iPad users can drag-and-drop files, though the feature is limited inside individual apps on iPhone, in contrast to between apps on iPad.

iOS 11 is popular now, and many iOS users want to experience iOS 11 by upgrading the system of their iPhone. However, some iOS users might operate somewhere wrong during the upgrade, and the upgrade fails or even worse their iPhone gets bricked after iOS upgrade. If you come across this situation, don't worry. Dr. Fone for iPhone can help you solve the problem. The special feature of Dr. Fone for iPhone is iOS System Recovery which has made system recovery become easier as never before for users to get iPhone, iPad and iPod touch out of white screen, Recovery Mode, Apple logo, black screen, and fix the issues when your iOS device perform abnormally. It will not cause any data loss while repairing the iOS system issues. Using this software, your iOS system will turn back to non-system version, so that withe screen, brickd iPhone or black screen will not happen again.

Here show you the steps to fix bricked iPhone after iOS 11 update.


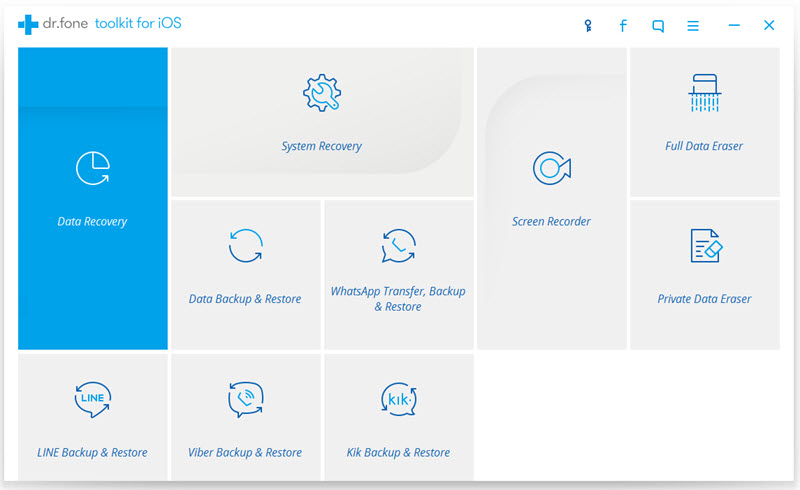
Step 1. Launch Dr. Fone and Connect Your iPhone

First, launch Dr. Fone for iPhone on your computer. Second, use USB cable to connect your iPhone to the computer.

Third, choose System Recovery on the mainpage and click the "Start" button to begin the repair.


Note: Please ensure the battery of your iPhone is enough for the recovery, or the process cannot work smoothly.

Please keep your iPhone connected along the whole recovery.


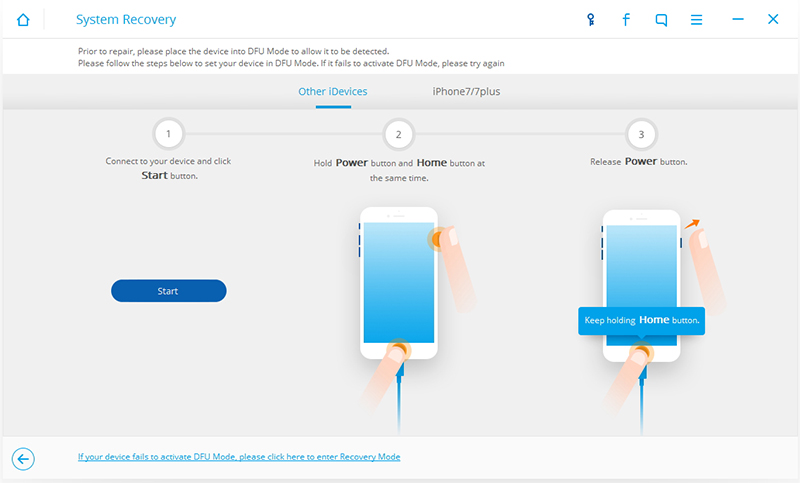
Step 2. Set Your iOS device into DFU mode

To establish the connection between your iPhone and Dr. Fone for iPhone, please set your iPhone into DFU mode.

Hold the Power button and Home button simultaneously for 10 seconds, and then release Power button but keep holding Home button.

Once your iPhone enters DFU mode, it will be recognized and detected by Dr. Fone for iPhone immediately.


Step 3.Confirm the Model and Download the Package

Here, the model of your iPhone has been detetced and is shown to you. Please check it correct or not. If it is wrong, you can select the correct model by yourslef. 


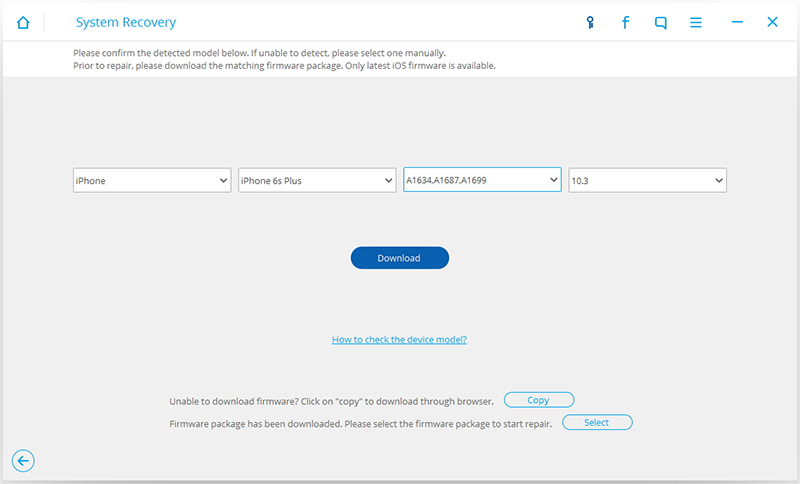
Next, please hit “Download” button directly to download the matching firmware package or choose “copy” to download package through browser.


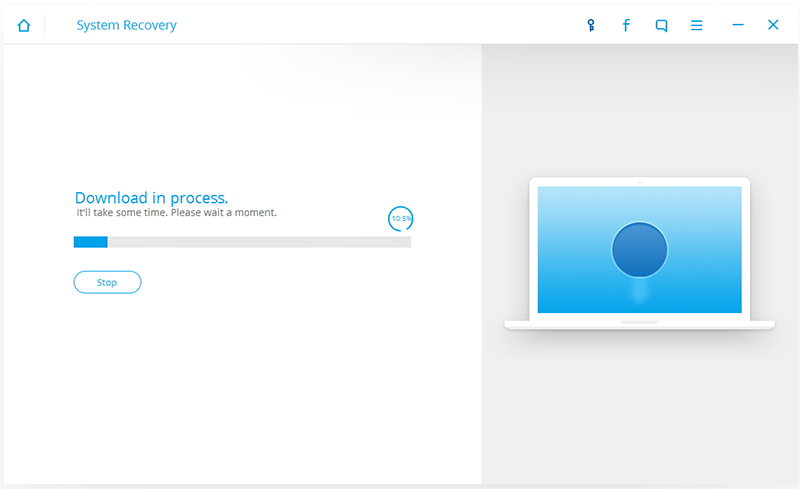
Note: It will take several minutes to download the firmware package, please be paitient.


Step 4. Fix iOS to Normal Status

Once the package is downloaded, Dr. Fone for iPhone begins repairing your iOS system automatically. In this process, please don't use the applicationa on your iPhone.


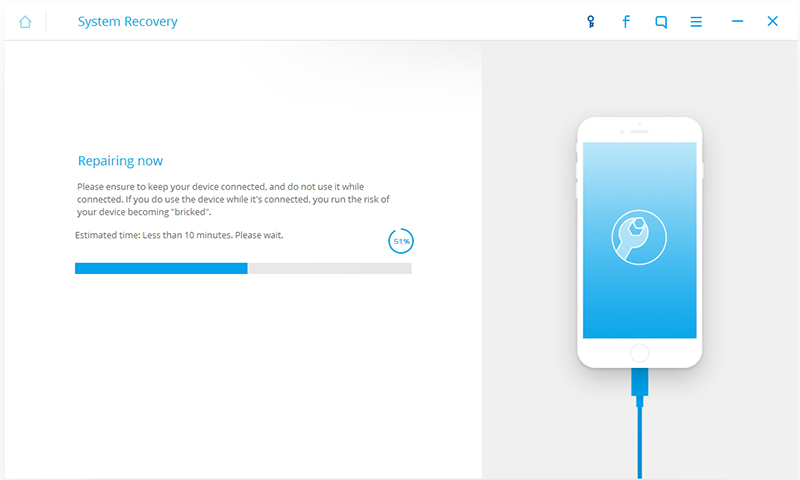
After a while, the repair of the operating system will be complete and your iPhone can work normally. The bricked iPhone after iOS 11 update is fixed, and all existing data on your iPhone is intact.


MORE INFO:

Fix iOS System to Normal for iPhone/iPad after iOS 11 Update

How to Fix iPhone/iPad Won't Slide to Unlock

Fix iPhone/iPad that Stuck in Apple Logo after iOS 11 Update


Fix iPhone/iPad that Stuck in Apple Logo after iOS 11 Update

iOS 11 is a major update to the world's most advanced mobile operating system, bringing new experiences and hundreds of features to iPhone and iPad. iOS 11 is the biggest software release ever for iPad, with powerful multitasking features, the Files app and more ways to use Apple Pencil. Augmented reality is coming to hundreds of millions of iOS devices with a new platform for developers to build apps that let users place virtual content on top of real-world scenes. Additional features include the ability to pay friends using Apple Pay, Do Not Disturb while driving to help users stay more focused on the road, even more intelligence and a new voice for Siri and new professional capabilities to Photos and Camera. iOS 11 is available as a developer preview today and will be a free software update for iPhone and iPad this fall.


However, during the update of iOS 11, someone might meet the situation that your iPhone/iPad will stick in Apple Logo, and their iPhone/iPad can't work normally. As a matter of fact, it is a common problem that phone users will meet duirng upgrating. Someone think this kind of problem is hard to fix, however, choosing Dr. Fone for iPhone can help out of the trouble effectively and powerfully. Dr. Fone for iPhone is the expert in fixing iOS system problem for iOS users who want to solve the problems as soon as possible without doing harm to their devices. It is capable of fixing black screen, white screen and other bugs perfectly and supports the latest iOS system.

Now, you are going to see how to fix iPhone/iPad that stuck in Apple Logo after iOS 11 Update with the help of Dr. Fone for iPhone.


Step 1. Connect Your Device

Open Dr. Fone for iPhone and connect your iPhone/iPad to the computer. After clicking into the option of System Recovery, please hit "Start" button to start the fixing.


Step 2. Set Your iPhone into DFU mode

Here, it is indispenable to put your iPhone/iPad into DFU mode, so that Dr. Fone for iPhone can recognize its model.
You can follow the instruction and images below to finish to task. The instruction is easy to understand and follow.


Step 3.Confirm the Model and Download the Package

Confirm the information of your iPhone/iPad, which display on the page. If the information unmatch, please correct it manually.


Besides, there is a matching firmware package you need to download. Click "Download" button to download it. If the package has download before, select the matching firmware for your iPhone/iPad.


Step 4. Fix iOS to Normal Status

After package, Dr.Fone for iPhone begins fix your stuck iPhone/iPad. Though the repairing may take at least 10 minutes, it is worth waiting for it.
When the repairing is over, you will find that your iPhone/iPad work normally and doesn't stuck in Apple logo any more.
If you don't get that effect, please restart your iPhone/iPad or try the fixing again.
Note: Your iPhone/iPad needs to be connected during the fixing.


MORE INFO:

How to Repair iPhone That are Stuck in DFU Mode

2017/07/13

Fix iPhone/iPad That Won't Turn On after iOS 11 Update


Many users will upgrade their device to iOS 11, but some users reflect the situation that their iPhone or iPad can't turn on after the upgrade to iOS 11.

Don't worry, maybe it's not that bad. First of all, you can determine whether your iPhone or iPad can't turn on because the battery has been used up. If this is the case that we can't turn on, please connect your iPhone or iPad to the power supply. If you see the sign on the screen and the battery is low, the battery is out of power. Then you can try to turn on after the device has been charged for a while. It seems that your device has consumed all of its power just because it upgrades the system.

If you are sure your current phone battery is full, but it doesn't work properly, there may be a problem with your iOS system. So how do we fix iPhone or iPad under the circumstance?


At this point, you can use dr.fone toolkit - iOS System Recovery to fix your iPhone or iPad. As the name suggests, this is a professional iOS system repair software, you can use it to repair a variety of scenes due to iOS system failures, such as won’t turn on, recovery mode, white Apple logo, black screen, looping on start, etc. What's more, it can not only successfully repair your iOS device, but it also preserves the integrity of device data. In other words, it will not delete any data in the device. In addition, it is compatible with the latest iOS systems and iOS devices, and it supports almost all iOS devices, including iPhone, iPad, and iPod touch.

Note: after using this function, your iPhone/iPad will be updated to the latest iOS version. And if your iPhone/iPad has been jailbroken, then it will be updated to non-jailbroken version. If you have unlocked your iPhone/iPad before, then it will be re-locked again.


Step 1. Run the dr.fone toolkit and Connect iPhone/iPad to computer

First of all, please download the dr.fone toolkit and run it on your computer. Then, choose System Recovery from the main window.

Next, use an USB cable to connect iPhone/iPad to computer. At this point, the program will recognize your iPhone/iPad and you need click "Start" when device identification is successful.


Step 2.
Boot your iPhone/iPad in DFU mode

Now, you see the instructions as shown in the figure below. You need to manually operate your iPhone/iPad so that they can go into DFU mode.

The concrete steps are as follows:

Please hold the Home button and Power button for about 10 seconds, then release the Power button and still hold the Home button.

After the iPhone/iPad is in DFU mode, program will automatically detect it. Then you can release the Home button.


Step 3. Select and download the firmware

When you are in the DFU mode state, you will enter a new window. You need to choose the right firmware to download. So you need to select the correct device model and firmware information. After confirmation, click "Download".


When firmware starts downloading, please be patient because firmware is large. Also, please keep your device in a stable network state.


Step 4.
Fix iPhone/iPad to normal status

When the firmware download is complete, the program begins to automatically fix your iPhone/iPad. And your device will work again. When this repair process is complete, the iPhone/iPad will go into normal mode. If it does not boot normally, you can click on Try Again to try the process again.


More info:

Repair iOS System Issues, Fix iOS System to Normal on iPhone

2017/07/06

Fix iPhone/iPad that Stuck in Recovery Mode after iOS 11 Update

A few days ago, Apple released the latest operating system - iOS 11. iOS 11 has added many new features. The first thing is to update the iMessage feature, update the sticker, and redesign the APP drawer. It also updated the camera APP, first of all, the mobile phone camera can automatically identify two-dimensional code, to open the page or payment. In addition, also support a new generation of image compression technology, it can make your photos in the premise of keeping and the same image quality, the file size is only half of the past, this means that the user will have more space to store more pictures and other content.The new system merges the lock screen with the notification center, and now the call center is brought up even from the top of the screen, even at the lock screen interface.


However, the emergence of the new system is not so perfect. After all, the system has just been developed, there are many deficiencies. With the use of people, there are sure to be more and more problems.

Some people are upgraded to iOS11, the phone is stuck in the recovery mode, can not be operated. At this point, you need a powerful software to help you, because it's not easy to get your cell phone back on track. dr.fone toolkit -iOS System Recovery has made it easier as never before for users to get iPhone, iPad and iPod touch out of white screen, Recovery Mode, Apple logo, black screen, and fix the issues when your iOS device perform abnormally. It is important that it will not cause any data loss while repairing the iOS system issues. But one thing to note is that after you use the software, your cell phone will become non jailbreak and automatically updated to the latest system. If you have unlocked your iOS device before, then it will be re-locked again.


Well, let's see how to properly use this software to get your iPhone/iPad back to normal.

Step 1.
Connect your iOS device

Launch dr.fone toolkit and choose System Recovery from the main window. At the same time, use the USB data line to connect your iPhone, iPad, or iPod touch to the computer. When the computer detects your iOS device, click "Start" to continue the process.


Step 2.
Boot your iOS device in DFU mode

To fix the iOS system problem, we need to follow the instructions of the software. First, set iPhone in DFU mode, hold down the Home button and the power button for about 10 seconds, then release the power button, and then press the home screen button. When the device is in DFU mode, the dr.fone will be automatically detected. Then you can release the home button.


Step 3. Select and download the firmware

At this point, you have to select your phone model and firmware information and download firmware here. Make sure your network remains stable during download.


Step 4
. Fix iOS to normal status

After the download firmware is complete, the program will automatically start repairing iOS and let the iOS device work properly. Once the repair process is complete, your iPhone will normally restart to normal mode.


Related Articles:

Repair iOS System Issues, Fix iOS System to Normal on iPhone